
This article is intended to be a beginners guide to air show / aircraft photography using a Digital SLR Camera which allows you to take control of more advanced features such as Shutter priority (Tv), Aperture priority (Av), metering etc. You can obtain some decent results in good weather by using the Auto modes such as the 'sports mode' which selects a fast shutter speed, however, sooner or later you will need to use the manual modes (Tv, Av) to gain full control of the camera and produce much better results. Below i have outlined the basics of photography to give the beginner an idea of how best to utilise a camera at airshows.


Holding a camera correctly
This may seem obvious but it is important to hold the camera correctly especially with long lenses when using them hand-held. Your forefinger of your right hand should be lightly on the shutter button, your other three fingers curled around the front of the camera on the grip, and your thumb at the back of the camera. Your left hand should be supporting the lens on a SLR camera. Your elbows should be tucked into your sides and your feet should be slightly apart to give you better stability and to reduce camera shake. When taking a photo you should gently squeeze the shutter button rather than stabbing at it. Before squeezing the shutter button you should exhale most of the air from your lungs and hold your breath and this should hopefully help to keep you from shaking the camera.
Panning a camera
'Panning' is an important technique when taking taking photos of aircraft in the air. When 'Panning' correctly it will allow you to reduce your 'Shutter Speed' to get the aircraft in perfect focus while having a blurred background for those take-off and landing shots which gives a really good impression of speed. It also helps when taking photos of propeller driven aircraft where you need a slower 'Shutter Speed' with a long lens to achieve good propeller blur. You need to focus on the aircraft early and keep it in the centre of the viewfinder while you pan the camera, keeping the camera moving smoothly at the same speed, follow the aircraft and take your photo(s) then keep 'Panning' smoothly even after you have taken your shot(s). This takes a lot of practice and the amount of background blur or propeller blur you achieve depends on how slow you set the 'Shutter Speed'. It can also help if you have an Image Stabilised lens.
Composition
'Composition' is a very important part of photography and can make the difference between an okay photo and a great photo. When shooting aircraft in the air then see where along the flightline they bank towards you and try to get some shots of the topside of the aircraft with the canopy and pilot visible. Underside shots of aircraft are generally not so interesting. Compose the aircraft so that there is more sky in front of the aircraft than behind it although this can be done in your post-processing with Photoshop or Paint Shop Pro later. Watch out for distracting backgrounds especially with take-off & landing shots and make sure the camera is held horizontally to avoid a sloping runway.
The ideal conditions, to shoot aircraft in the air, is against a blue sky with white fluffy clouds and the sun behind you but you can still take great photos in less than ideal conditions with a bit of imagination. Action shots of fast jets with full reheat/afterburner and vapour coming off the wings can look awesome and even shooting in dark skies can produce some very nice atmospheric shots, especially when the sun breaks through the clouds. The best light for photography is early morning and late evening when the sun is low in the sky and you get nice rich and warm colours.
Using a camera at airshows for static aircraft
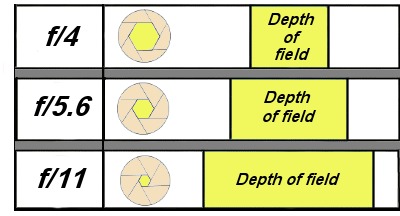
When taking photos of static aircraft the 'Program (P) exposure mode' is very useful and simple to use or if you want to extend or decrease 'Depth-of-Field' then 'Aperture-priority (Av) exposure mode' is useful. You may also find that if you stop the lens down to something like f/8 using 'Aperture-priority (Av) exposure mode' you will get the best out of the lens with a sharper Image Quality.
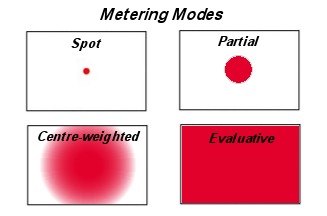
The 'Metering mode' is best set to 'Evaluative' mode to meter for the whole image. The 'AF Mode' should be on 'One-Shot Auto Focus' so the camera focuses just once when you half-press the shutter button which allows you to recompose the shot if required and 'Continuous Shooting' should be off so when you press the shutter button it only takes one photograph. When taking a photo of a static aircraft then determine which side of the aircraft is brightest. In other words try to make sure the sun is more or less behind you if possible. This is just a general rule and obviously doesn't apply if you are intentionally shooting towards the sun for a sunset photo with the aircraft in silhouette. On a bright sunny day you might find a polarising filter useful for taking photos of static aircraft so that you can illiminate the glare of the sunlight on the canopy and also give the blue sky much more contrast. When using a polarising filter you will find that it works best when your camera is pointing ninety degrees from the sun. You will also lose two stops of light when using a polarising filter making your lens slower.
Take-off & landing shots
Find a place on the flight-line at the end of the runway where the aircraft are landing or taking-off. You will need a slow 'Shutter Speed' for both jets and propeller driven aircraft to achieve background blur. 'Panning' technique and holding the camera steady will be essential when using slow 'Shutter Speeds' and try to take the photo where there is not too much background clutter. Also try to keep the camera horizontal so that the runway is level.
Using a camera at airshows for aircraft in the air
When taking photos of aircraft in the air with a long lens it is advisable to use 'Shutter-priority (Tv) exposure mode' which allows you to set the shutter fast enough to avoid camera shake and to capture fast jets or to have a slower 'Shutter Speed' to photograph propeller driven aircraft. Some people prefer to use 'Shutter-priority (Tv) exposure mode' for taking photos of prop-driven aircraft so they can lower the shutter speed to capture prop-blur and use 'Aperture-priority (Av) exposure mode' for taking photos of jets, so they can stop the lens down for better image quality and more 'Depth-of-Field'. The 'AF Mode' should be on 'AI Server', and it is best to use the centre Auto Focus point so that the camera focuses on the aircraft and not the sky or background.
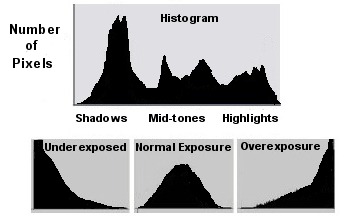
Start by selecting the lowest 'ISO speed' and select a 'Metering mode' that meters for the centre of the image. If you select 'AI Server' AF mode along with 'Continuous Shooting' then the camera will continue to Auto Focus on the aircraft as you pan the camera and will allow you to take several shots during a single pass of the aircraft if needed. Take a few test shots of aircraft and check the LCD and 'Histogram' to make sure the 'Exposure' is correct. If it is underexposing then adjust the 'Exposure Compensator' to overexpose slightly and take more test shots. If conditions are overcast and you can't achieve a very high 'Shutter Speed' then increase the 'ISO speed'. It is also a good idea to make sure the aircraft fills the frame so that the aircraft is well exposed and uses maximum resolution of the sensor.
Try and shoot the aircraft at the area of sky that is opposite to the sun which is not always possible but you will achieve better photos if the sun is behind you. Also keep checking the photo on the LCD as well as the 'Histogram' to see if the 'Exposure' is correct as during an airshow the sun will move and the weather conditions may change slightly with more or less cloud covering.
For fast jets then you can shoot them at a high 'Shutter Speed' unless they are taking-off or landing and you want background blur. A 'Shutter Speed' of at least 1/500 second or more for a lens of 300mm or 400mm should be okay for jets. Some people prefer to shoot at higher shutter speeds for jets such as 1/1000 second but this will only be achievable depending on the amount of light available, the speed of your lens and your ISO setting. When shooting propeller driven aircraft then you will need to drop the 'Shutter Speed' to 1/350 or 1/250 second or lower to achieve good prop blur. 'Panning' technique and holding the camera steady will be essential for taking photos of propeller driven aircraft and an Image Stabilized lens might also be useful.
Tips on using a DSLR camera at Airshows
• Increasing the ISO speed is useful in low light conditions to maintain a higher shutter speed or keep the aperture from being wide open. A slower ISO speed of ISO 100 will result in a less grainy/noisy picture rather than a higher ISO such as ISO 800.
• Due to the focal length of most DSLR cameras being multiplied by something like 1.6x a very wide angled lens will be required to take photos of static aircraft close-to and museum aircraft. Actually the 1.6x crop factor does not really increase the focal length but as the sensor size is smaller than a Full Frame (FF) camera then the Field-of-View is actually smaller.
• Using a long telephoto lens can cause camera shake, to eliminate this the general rule is to set the shutter speed to the focal length of the lens. So if you use a 300mm telephoto lens then you would need a shutter speed of a least 1/300 second. Don't forget to add in the crop-factor of a DSLR camera - so with a camera with a 1.6x crop factor and a 300mm lens it is safer to increase the shutter speed to (300x1.6=480) about 1/500 second. Please note that this is just a general rule and it is certainly possible to hand-hold a 300mm lens below 1/300 second especially when panning and holding the camera correctly or using an imaged-stabilized lens. Taking photos of propeller-driven aircraft usually require you to break this rule by having a slow shutter speed to capture prop-blur.
• When taking photos of jets then you should try to use a fast shutter-speed but when taking photos of a prop-driven aircraft or helicopters then you need to lower the shutter-speed so that you do not freeze the propeller or rotor, which looks very unnatural. Try to keep the shutter-speed below 1/350 second by using a good panning technique, taking lots of photos, or using an image-stabilized lens.
• If you need a fast shutter speed then you will need to open the aperture wider but you should be aware that a wider aperture means less depth-of-field and so focusing becomes much more critical. Increasing the ISO speed will also give you a faster shutter speed instead of having a wide-open aperture but expect some grain/noise. Bear in mind that most lenses are sharper with the aperture closed down slightly.
• When taking pictures of aircraft in the air against a bright sky the cameras metering system can be fooled into underexposing the actual aircraft so it is best to set the camera's 'Exposure Compensator' to overexpose depending on how much of the frame is filled with the aircraft, aircraft colour scheme, position of sun, camera etc. Take a few test shots and view the camera's LCD and Histogram to determine how much to overexpose the image.
• When taking photos of aircraft against a white mainly cloudy sky then look for any patches of blue sky away from the sun and plan to take your photos aginst that background which should help significantly with getting a good 'Exposure' and result in a more aesthetic looking photograph.
• When taking a photo of an aircraft in the air its a good idea to select Spot or partial metering so that the camera sets the exposure for mainly the aircraft rather than the bright sky.
• The composition will also make a big difference to the photograph. Generally i like to get a shot of the topside of the plane with the canopy visible but it is really down to personal preference.
• For runway shots of aircraft taking-off and landing it's best to find a spot at the end of the runway. Also with runway shots make sure the background is not too cluttered if possible as it can ruin a shot. Also make sure that the camera is held horizontal so that the runway does not appear to slope. Keep the shutter speed as low as you dare so that the aircraft is sharp but the background is blurred which gives the impression of speed. With plenty of panning practice you can sometimes get a good photo even at 1/60 second shutter speed.
• Some find a UV or Skylight filter is useful for protecting the front element of your lens although others think that you will get better Image Quality without one. A circular polarising filter can be useful for static shots to cut the glare of the sun on the aircraft canopy and make the sky stand-out. A polarising filter works best with the sun at 90 degrees to your position. You will lose up to 2 stops of light using a polariser making your lens slower. If you do use filters on your lens then it is worth while investing in a good quality filter especially on expensive lenses.
• A lens hood is very useful on a sunny day because it prevents sun flare and protects the lens if it rains.
• Be careful when using a digital SLR in the rain as they are packed with sensitive electronics and are not always waterproof. This also applies to the lens, as even some Canon L lenses are not weather-proof. It is a good idea to use a commercially available rain cover or if raining heavily then it's safer to stop using the camera and store it in a waterproof bag unless you want a very expensive repair bill.
• Some DSLR cameras have 'Camera User Settings' called C1, C2 etc on Canon cameras and U1, U2 etc on Nikon cameras. This can be very useful for having settings for jets in C1 (fast shutter speed), and settings for props in C2 (low shutter speed) and to be able to quickly switch between the two settings. You could also have settings for static aircraft in C1 and flying aircraft in C2 for example.
• Once you have taken all your photos then you will need to make a backup copy of the originals onto HDD/DVD/memory stick and then use copies to digital enhance your best photos for use on the internet or for printing. External Hard Drives are reasonably priced today and have very large capacities which are well worth it to keep your photographs safe. The more backups that you have then the safer your photos will be. I personally make a backup of all my photos on two separate internal Hard Drives of a Desktop computer, a laptop computer, an External 2TB Hard Drive, and also archive to DVDs. It's also a good idea to keep a backup of your photos offsite or in the cloud. More information on digitally enhancing your photos or about Canon Digital SLR cameras and lenses can be found on this website.